All about food

All about food

Thursday, April 30, 2015

Nyonya Fragrant Pork - Babi Chin

With the combination of different ingredients and spices used in Nyonya dishes, the taste of Nyonya cuisine has its uniqueness which are largely enjoyed by all races, reflecting the cultural mix of the community.  As Malaysians, we are blessed to have the opportunity to try out, cook and enjoy most of the delicious Nyonya dishes.


Today, I would like to share another of my home-cooked Nyonya pork dish with everyone especially pork belly lovers.


What you need:

  • one strip pork belly (clean and cut into chunk with skin on)
  • 3 pieces dried shiitake mushrooms (softened and halved)


  • 3 shallots (sliced)
  • 3 cloves garlic (sliced)
  • 3 star anise
  • 1 tbsp ground coriander
  • 1 red chilli (sliced for garnish) - not in picture
  • 2 tbsp cooking oil
  • 3 cups water (for cooking, add more if needed)

Seasonings:
  • 1 tbsp dark soya sauce
  • 1 tsp sugar 
  • 1/2 tsp salt (to taste)
  • 1/4 tsp grounded pepper
Methods:
  1. In a heated wok, add in cooking oil and saute shallots and garlic till brown and fragrant. 
  2. Add in ground coriander and star anise and fry for a minute.
  3. Stir in the pork belly and shiitake mushrooms till well mixed.
  4. Add in all the seasonings, stir well and then add in the water.
  5. When it comes to a boil, lower the heat and simmer until the pork belly is tender and sauce has reduced.  
  6. Serve in a bowl garnished with sliced chilli.

Wednesday, April 29, 2015

Snacks - Puff Pastry....

Making puff pastry has never been my interest, so each time when I yearn to make some snacks with puff pastry, I will just purchase the ready made frozen ones from the supermarket.

Curry Puffs is one of my favourite snack since young.  Once a while I will make my own at home to enjoy and share with my mum, as any food suits my mum's palate and she very seldom complains. 

I have here to share, my simple curry puff snack....

Few simple ingredients:

  • 1/2 chicken breast (cubed)

  • 1/2 onion (cubed)
  • 1 potato (peeled and cubed)

  • 1 tbsp blended chilli paste (refer to my one-pot curry dish for the recipe)
  • 1 1/2 tbsp curry paste (mixture of all the different ingredients) - put less if you don't prefer a strong curry flavour.

  •  1 packet of frozen puff pastry purchased from supermarket (not in the picture)
  •  1 egg yolk, lightly beaten (for sealing the edges of the puff pastry and glazing)
  •  2 tbsp cooking oil, for frying (not in the picture)
  •  enough water, for cooking
  •  salt (to taste), if necessary
Few simple steps to cook the filling:
  1. In a heated wok add in 2 tbsp cooking oil, fry the blended chilli paste till fragrant add in the curry paste and continue stirring till well mixed.
  2. Add in onion, chicken and potato, stir till well combined.  Taste for correct seasoning and add salt if necessary.
  3. Add in enough water to cover the ingredients (not too much at one time) and continue to cook till the potato are cooked through and the sauce has slightly thickens. 
  4. Switch off the heat, leave the ingredients to cool down in a bowl before proceeding to the next step.

Assembling the curry puffs:
  • Place a piece of the defrosted puff pastry onto a work surface.  Spoon filling onto one side of the pastry, brush the sides with the lightly beaten egg yolk, fold into half, lightly press the sides to ensure that the pastry hold together well.
  • To create some simple design on the edges of the curry puff, use a fork to lightly  press on the edges.
  • Brush with beaten egg yolk and place in a lightly greased baking sheet.  Repeat till all is done.
  • Bake in preheated oven of 200 degree Celsius till golden.
  • Serve.

With the leftover Chinese Sweet Cake or commonly known as Ti Kuih, I come up with one puff pastry with the Ti Kuih filling..... YUMMY!


Spreading the leftover curry filling over slices of baguette also makes great snacks.


Friday, April 24, 2015

Melting Moments

The name of this cookies tells it all "Melting Moments!"  This melt-in-the-mouth cookies can be served as it is, but since I have a bottle of Fig Preserve lying in the fridge I've decided to sandwich the cookies together with the fig preserve and the outcome is great!


This quick and easy recipe comprises only of 4 simple ingredients, and here's to share......

This is what you need:
  • 125g unsalted butter (room temperature)
  • 25g icing sugar (sifted)
  • 125g plain flour (sifted)
  • 25g cornflour (sifted)
Few simple steps:
  1. Beat the butter and icing sugar using an electric mixer till light and fluffy using medium speed.
  2. Line two baking trays with parchment paper and put aside.
  3. Add in both the flour slowly and mix using low speed and scrapping the sides of the mixing bowl with a cake spatula to ensure that all the ingredients are well combined.  For this step we can also use hand to mix.
  4. Pinch a bit of dough and roll into balls (size depending on your preference but bearing in mind that the cookies will increase in size when baking).
  5. Arrange the rolled dough in the baking sheet lined with parchment paper, remember to give some space in between for it to rise.  Repeat till all is done.
  6. Lightly flatten the top of the round dough with finger and follow by a wet fork.
  7. Bake in a preheated oven of 180 degree Celsius for 20 minutes (depending on the type of oven we are using) till lightly golden.
  8. Cool for about 5 minutes in the baking tray, take out and leave on a wire rack to cool further.
  9. Sandwich the fig preserve with two pieces of the cookies, sprinkle some icing sugar over it and it's time to serve!
Let's have TEA......

Monday, April 6, 2015

One-Pot Curry Dish

My family's 'One-Pot Curry Dish' is simple to prepare with several veggies which are commonly used to cook curry, dried beancurd or commonly known as taupok and some chopped bite-sized chicken.  This curry dish goes well with either rice or bread, and here's something to share from my family's photo album.....

Curry with rice and lettuce on the side

Curry with bread and coleslaw on lettuce cup 
With greatest pleasure I would like to share the recipe for this One-Pot Curry Dish......

What you need:
  • 3 red chillies (wash, remove seeds and cut thickly)
  • 5 shallots (peel, wash and slice thickly)
  • 5 garlic (peel and wash)
Blend with 2 tbsp of cooking oil until fine paste
which makes half cup of chilli paste
  • RM1.50 of curry paste (purchase from wet market)

  • 10 pcs. taupok (to be cut into half)

  • Chicken thigh and wings (cut into bite-size pieces)

  • Cabbage (tear into slightly bigger pieces, wash and drain)
  • Longbeans (cut into your desired length, wash and drain)
  • Brinjals (wash and cut just before cooking as cut brinjals browned easily)


  • 1 grinded coconut (not in picture) - mix with half bowl of water to obtain the first squeeze of thick coconut milk, then mix with another bowl of water to obtain the second squeeze and leave aside individually for later use.
  • 3 tbsp cooking oil
  • water for use during initial stage of cooking.
  • salt and msg (to taste)
Few simple steps to follow:
  1. In a deep heated wok, put in 3 tbsp of cooking oil, when oil is medium heat add in the grinded chilli paste and fry till slightly brown.
  2. Add in the curry paste and mix till well combined, stirring often to prevent from sticking onto the base of the wok.
  3. Add in the chicken pieces and stir well till the meat turns pale.
  4. Add in about half bowl of water, follow by long beans and stir well.
  5. Add in some salt and msg, cabbage, brinjals and stir till well combined.
  6. When it comes to a boil add in the second squeezed coconut milk, stir constantly to ensure all the ingredients are properly cooked through.
  7. Add in the the taupok, stir to mix and taste for correct seasonings.
  8. When the dish is done, add in the thick coconut milk, give it a quick stir till well combined and when it comes to a boil, off the heat.
  9. The One-Pot Curry is ready and it's time to serve..........

Notes:
  1. The amount of ingredients used depends on individual family.  I love brinjals, so each time I cook this dish I will definitely put in more brinjals.
  2. Do not over-cook the vegetables as they will continue to cook further even in the pot when the heat is switch off.
  3. As usual, do not over-boil the first squeeze of thick coconut milk, it must be added last when all the ingredients are cooked and once it comes to a boil the heat must be switch off, this is to prevent the coconut milk from curdling which spoils the texture and taste of the curry.

Monday, March 23, 2015

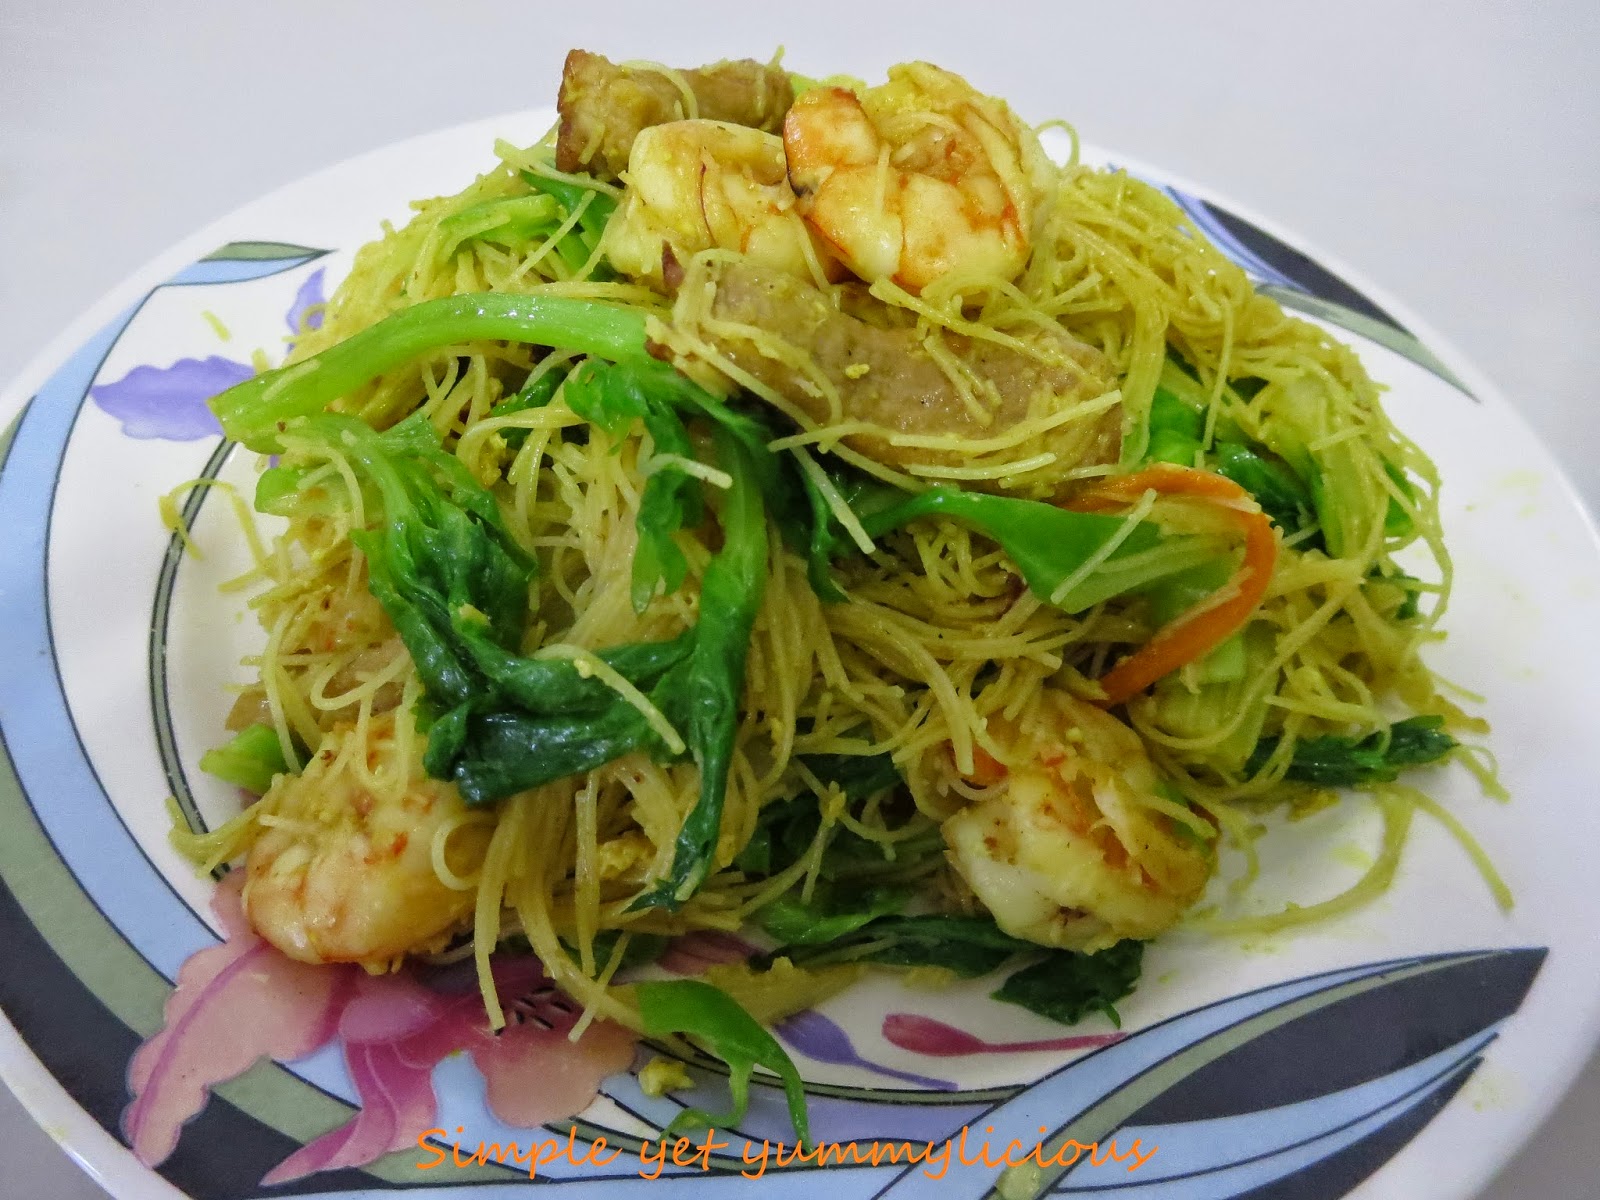
Singapore Style Hongkong Fried Beehoon

During my recent trip to Hongkong the weather has been cooling and at times when it drizzles along with the breeze it can be rather cold.  Throughout our 5D4N stay there we have to put on an extra jacket if we are out and not to mention, we haven't sweat a bit! The one and only time which both me and hubby feel the heat and slightly sweat is when we have our dinner of Singapore Style Hongkong Fried Beehoon.  Though it is just a simple stir-fried dish but the extra ingredients of curry powder makes the dish taste awesome. While I am enjoying the food I also gets to observe the ingredients used as well as making full use of my taste buds to try to get as close as possible to improvise this dish at my home kitchen.

Here's to share "from Hongkong to Kuching!"

This is what you need: (Serves 3)
  • half onion (sliced)
  • 5 pip garlic (coarsely chopped)


  • 2 egg (lightly beaten)


  • some sliced meat (I use pork tenderloin which is soft, so I cut it slightly thicker) marinate with 1/2 tbsp of light soy sauce and cornflour


  • some prawns (shelled and deveined)


  • some shredded red carrot
  • shredded cabbage
  • celery (young part, leaves with the stem)


  • 1 1/2 piece of beehoon (soaked)

  • 1 1/2 to 2 tbsp curry powder, depending on individual liking (I use the watch brand)
  • 1 cup cooking oil (for frying the meat)
  • water
Seasonings:
  • 3 tbsp light soy sauce 
  • chicken stock granules (to taste)
  • dash of grounded pepper
Few simple steps:
  1. In a heated wok add in cooking oil, fry the pork tenderloin using medium heat until almost cook, dish and drain.  
  2. Discard oil, leave about 3 tbsp, fry the garlic and onion until fragrant.
  3. Add in prawns, stir fry briefly, add in all the veggies and give it a quick fry.
  4. Add in the curry powder and mix till well combined.
  5. Move the fried ingredients to the side of the wok, add a tbsp oil then the beehoon and give it a quick fry. 
  6. Mix in all the other ingredients, the fried pork, add in seasonings and water. Stir till all the ingredients are well combined. Taste for correct seasoning.
  7. Make a well in the center, pour in the beaten egg and give it good mix to ensure that the eggs are evenly combined with the beehoon.
  8. Drizzle dash of grounded pepper.
  9. Off the heat, dish on serving platter and it's time to enjoy!

Notes:
  1. The actual dish does not use celery but spring onions.  I am using it to cook this dish as I have leftover the tender leafy park of the celery from making my daily celery juice. However, it taste great on this dish.
  2. If you are cooking for a bigger crowd I suggest dishing out the fried ingredients into a plate at Step 5 so that the ingredients won't have to be overcooked and the beehoon gets to be fried evenly.

Saturday, March 21, 2015

Chinese New Year Ti Kuih

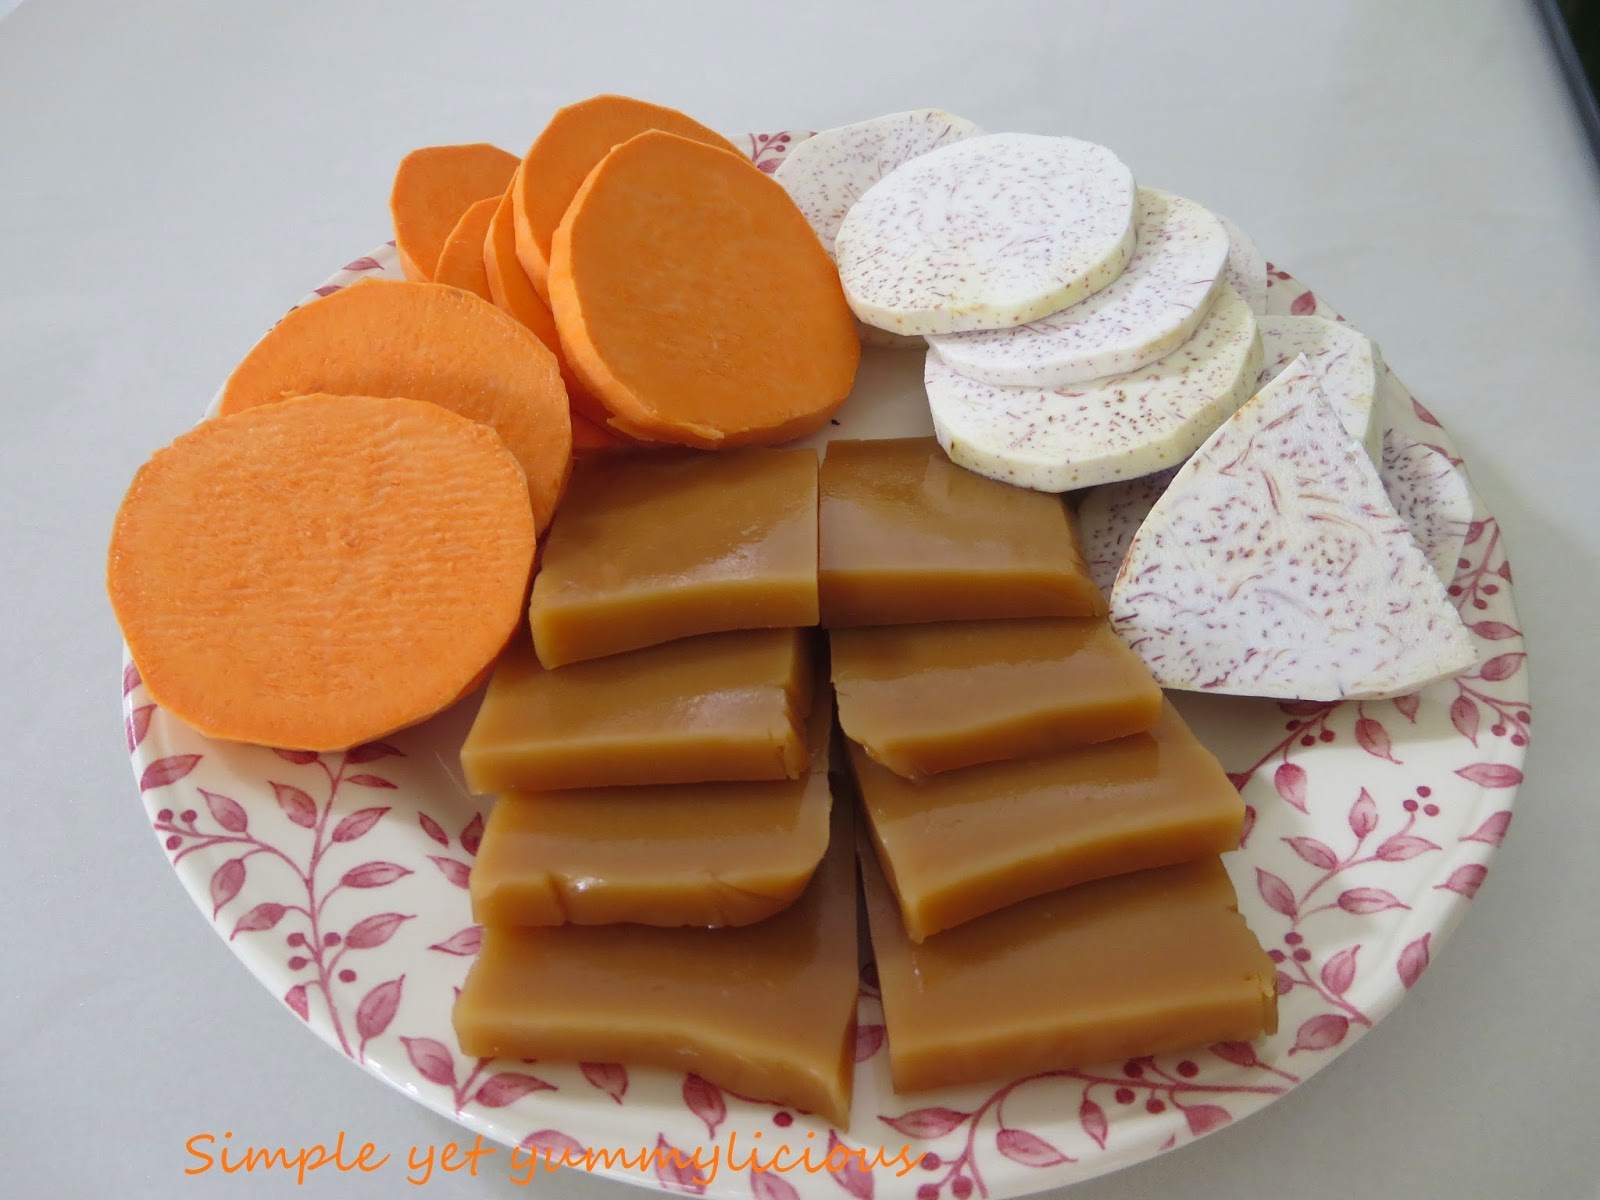
This sweet-sticky rice cake which is commonly called Ti Kuih in Hokkien dialect is also known as Nian Gao or Kuih Bakul.  Though it is commercially sold throughout the year but it is not commonly eaten.  However, during the Lunar New Year celebration it is a must-have food item to buy either as gifts for close relatives, for decorations on the table, for the Buddhist for offering to their God, and most importantly for the family's consumption, especially on the 20th day of the Lunar New Year.  

For my family there are 3 different methods of serving this sweet-sticky rice cake. Here's to share......

1.  Shallow pan-fried with beaten egg

This is the most simplest method which I get to learn from my mum since when I was young.  Few simple steps:

  1. Slice the sweet cake into slices, thickness depends on individual liking, but not too thick as it might not be able to cook through before the egg coating is overcooked or burnt.
  2. Break one or two egg in a bowl (depending on how much sweet cake you are going to cook) and beat with a fork.
  3. In a medium heated wok, add in oil (just enough for shallow fry).
  4. Dip the sliced sweet cake into the beaten egg and put in the medium heated oil for frying.  
  5. Turn over once when the coated egg has browned.
  6. When the sweet cake has soften and is golden in colour, dish out and serve.
2.  Fried with flour and egg batter
  • In a bowl add in about 1 cup of sifted plain flour, 1 small size egg and gradually mix in water untill you get a batter with a consistency which is not too thin or too thick.


  • slice the sweet cake into slices, not too thick or too thin


  • Heat a wok with enough oil for medium fry.
  • Dip the sliced sweet cake into the batter, drip off some excess, then put into the medium-low heated oil.
  • Turn once and when both sides are golden brown dish and drain on a wire rack (do not use kitchen paper as it might stick onto the paper).
  • Serve immediately if you prefer it crispy.


3.  Deep-fried sticky sweet cake with yam and sweet potato
  • In a bowl mix 2 cups plain flour and 1 egg with enough water to get a consistency of not too thin or thick


  • Slice the sweet cake, yam and sweet potato to almost even size, but for the thickness the yam must be slightly thinner than the sweet cake and sweet potato as yam is tougher to cook.  


  • Heat enough oil in a deep wok.
  • For each frying dip one each of the yam, sweet cake follow by the sweet potato into the batter, let excess batter drip off, then immediately put into the heated oil of medium heat for deep frying.  Fry them in batches and do not over-crowd the wok.
  • Turn few times to ensure that the yam and sweet potato are properly cooked. I use a wooden skewer to prick and ensure that the yam is soft and cooked through.
  • Dish and drain on a wire rack.


  • It's ready to serve!  If you prefer it crispy consume it when hot, but it also taste equally yummy when cooled.


The first and second method of serving this Ti Kuih are the conventional method, which have been made popular and practiced since the days of my parents and grandparents.  I get to learn this third method from my late mother-in-law.  For those who loves both yam and sweet potato it is heavenly, but for those who doesn't eat yam like the case of my children, then I would normally use two pieces of sweet potato and omit the yam. It is a good combination of yam, sweet cake and sweet potato as it helps to balance up the sweetness of the Ti Kuih.  However, I should admit that the Ti Kuih today are not as sweet as those years back.  Most people are trying to stay healthy by reducing the intake of sugar or consuming less sugary or sweet food.  

Enjoy cooking!
Thursday, March 19, 2015

Easy Pandan Kuih Bangkit

Kuih Bangkit has always been my favourite cookies since young.  During my young days we only get to eat this yummy cookies during Chinese New Year.  The recipe which I've previously used to bake this cookies is time consuming as the flour needs to be fried using low heat and cooled before we can start making them.  Besides, the outcome of the cookies are not as delicious as I expected.  I prefer Kuih Bangkit which is soft and 'melt-in-the-mouth' rather than crunchy or hard.

Just before the Lunar New Year I came across a recipe 'Easy Pandan Kuih Bangkit' which is so tempting to my taste buds, but due to time constrain I did not get to bake them for the new year festival.  Today, I've decided to try a hand on this deliciously-tempting recipe and the outcome is simply YUMMY, soft and melt-in-the-mouth!  Thank you Alice for sharing this great recipe at http://iloveicookibake.blogspot.com. This is one recipe which I will continue to bake share and enjoy.

Here's to share.....


Ingredients:
100g butter
80g icing sugar (sifted)
a pinch of salt
1 egg
50ml coconut milk
1 tbsp freshly squeezed pandan juice (or 3/4 tsp pandan paste)
2 cups cornflour 
1 cup tapioca flour 

Methods:

  1. Sift both flours and put in a bowl for later use.
  2. Mix the coconut milk together with the egg and pandan juice, leave aside.
  3. Cream butter, icing sugar and salt till light and creamy.
  4. Add in the egg mixture slowly and beat till well mixed.
  5. Fold in the flour and mix till well combined.
  6. Shape the dough using your preferred design and place them in a lined baking tray.
  7. Bake in a preheated oven of 180 degree Celsius for about 20 to 25 minutes.

Note:  If pandan paste is used you will be getting a more greener cookies as compared to the extracted pandan juice.  I am satisfied with this lighter green colour of my favourite Kuih Bangkit.  It's "Simple Yet Yummylicious!"